
An assembly manual is included with the product, but please also read the assembly instructions below before assembling the product.
Tools required for assembly
- 1 pair of 30mm wrenches or spanners
- 17mm wrench or spanner
・Stepladder (or large footstool) 1 unit
1. Opening
The unit will arrive in 3 boxes.

The assembly instructions are in the larger square box.

2. Assemble the base and guide rod parts, connect to the rack, and attach the footrest and plate mounting parts.

First, connect the guide rod to the base. It is easier to do this by laying it on its side as shown in the photo below.

Important points : *If the ceiling height is not sufficient and the plate mounting part cannot be attached with the guide rod standing, please attach the plate mounting part at this point before standing the guide rod.
Stand the connected base and guide rod upright and connect them to the rack, then attach the footrest and plate mounting part.

Important points : *When attaching the plate mounting part to the guide rod, be sure to remember to place the rubber ring under the plate mounting part and the plastic pipe above the plate mounting part.
3. Assembling the upper unit

Place the upper unit on the machine and secure it with bolts. Since you will be working at a height, please use a sturdy stepladder or footstool and work carefully to avoid accidents.

Important points : *The upper unit is designed so that its position can be adjusted forward and backward. Make sure to install the upper unit in a position where the rod is vertical .

4. Cable installation

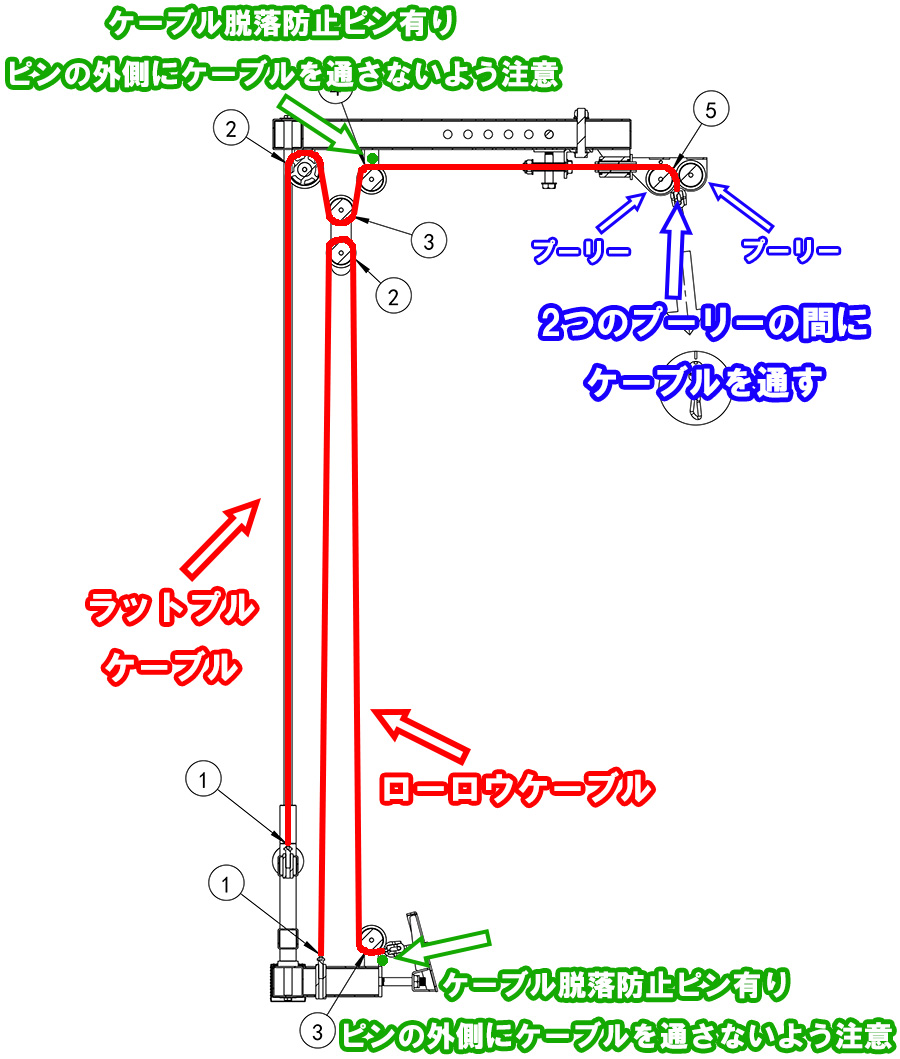
Pass the cable through. The longer cable is for the low row side and the shorter cable is for the lat pull side.
Pass the cable through from the lat pull side (shorter cable) to the low row side (longer cable).

The length of the cable can be adjusted with the bolt. Adjust it to a length with no slack, and then tighten the nut to secure it in place.

Important points : * Remove the carabiner and ball at the end of the cable, then pass the cable through and reattach them.
*Please pay attention to the position where you pass the cable through. After assembly, first check that it moves smoothly without attaching any weights. If it gets stuck, check that you have passed the cable through the correct position. The cable basically only touches the resin of the pulley and guide. If you pass the cable through the wrong position, the coating may be damaged after a few uses. Please be especially careful not to pass the cable through the outside of the anti-drop pin.